Helm chart customization
How to customize Helm Chart Values
In the Getting Started guide, we designed a SaaS Product that deploys Redis Clusters using a Helm chart. However, in that example, we had all the pods deploy to any available VM in the Kubernetes cluster. In addition, these pods were collocated on the same VM, not an ideal scenario for High Availability.
In this guide, we will show you how to customize the infrastructure for the Helm chart to deploy the Redis Master and Replica pods on separate VMs. We will also introduce a custom instance type for the Redis Master and Replica pods that your customers can specify through the Customer Portal we generated.
Info
A complete description of the Plan specification can be found on Getting started / Plan Spec
Reference API Params from Helm Chart Values
First, we need to update the Helm chart to support the new features. We will add two new parameters to the values.yaml file to allow customers to choose the instance type for their workload and the number of replicas they want to deploy.
Info
You can use system parameters to customize Helm Chart values. A detailed list of system parameters be found on Build Guide / System Parameters.
...
    apiParameters:
      - key: replicas
        description: Number of Replicas
        name: Replica Count
        type: Float64
        modifiable: true
        required: false
        export: true
        defaultValue: "1"
      - key: instanceType
        description: Instance Type
        name: Instance Type
        type: String
        modifiable: true
        required: false
        export: true
        defaultValue: "t4g.small"
...
The apiParameters section in the specification defines the API parameters that you want your customers to provide as part of the provisioning APIs for your SaaS. For more information see: API Parameters.
Next, we will use the new API parameters to set the number of replicas and the instance type for the Redis Master and Replica pods in the values.yaml file.
...
    compute:
      instanceTypes:
        - apiParam: instanceType
          cloudProvider: aws
        - apiParam: instanceType
          cloudProvider: gcp
        - apiParam: instanceType
          cloudProvider: azure

    replica:
      ...
      replicaCount: $var.replicas
...
Configure High Availability with Affinity Rules
To ensure High Availability, you need to deploy pods across separate VMs. Omnistrate provides two approaches for managing Kubernetes affinity rules in Helm deployments:
- Automatic injection (default) — Omnistrate automatically injects the required node affinity and pod anti-affinity rules into your Helm chart manifests at deploy time.
- Manual configuration — You explicitly define affinity rules in your Helm chart values for full control.
Automatic affinity injection (default)
By default, Omnistrate automatically injects affinity rules into all applicable Kubernetes workload resources (Deployments, StatefulSets, DaemonSets, ReplicaSets, Jobs, CronJobs, and Pods) rendered by your Helm chart. This means you do not need to manually specify affinity rules in your chart values — Omnistrate handles it for you.
The automatic injection performs the following:
- Node affinity: Ensures pods are scheduled only on Omnistrate-managed nodes in the correct region, matching the designated resource and node pool version. The injected node selector expressions include:
omnistrate.com/managed-by— targets Omnistrate-managed nodestopology.kubernetes.io/region— matches the deployment regionomnistrate.com/resource— matches the resource IDomnistrate.com/version— matches the node pool version ($sys.compute.node.version)
- Pod labels: Adds the
omnistrate.com/schedule-mode: exclusivelabel to pod templates. - Pod anti-affinity: Ensures pods with the
exclusiveschedule mode are spread across different hosts for High Availability.
Note
Automatic injection is enabled by default. If your chart values already contain affinity rules, Omnistrate intelligently merges the injected rules with your existing configuration without creating duplicates.
This behavior is controlled by the chartAffinityControl setting in the helmChartConfiguration section:
...
    helmChartConfiguration:
      chartName: redis
      chartVersion: 24.1.0
      chartRepoName: bitnami
      chartRepoURL: https://charts.bitnami.com/bitnami
      chartAffinityControl:
        enableInjection: true   # Enabled by default
        enableSharedHost: true  # Enabled by default
...
| Property | Type | Default | Description |
|---|---|---|---|
enableInjection | boolean | true | Enables automatic injection of node affinity and pod anti-affinity rules into Helm chart manifests. |
enableSharedHost | boolean | true | Controls whether pods that use automatic affinity injection are allowed to share the same node. When set to false, Omnistrate enforces strict anti-affinity so |
| those pods are scheduled on separate hosts whenever cluster capacity allows, rather than being co-located for bin-packing. | |||
To disable automatic affinity injection (for example, if you want full manual control), set enableInjection to false: |
Manual affinity configuration (advanced)
If you prefer to manage affinity rules entirely yourself, you can disable automatic injection and define the rules directly in your chart values. However, this is rarely necessary — automatic injection intelligently merges with any custom affinity rules you define in your chart values without overriding them. Only Omnistrate-specific rules that are not already present are appended, so your custom affinity logic is always preserved.
Tip
You do not need to disable automatic injection to use custom affinity rules. Omnistrate merges its rules with yours, so you can add custom affinity logic in your chart values and leave injection enabled.
First, add a pod label for setting the anti-affinity between the master and replica pods.
...
        master:
          podLabels:
            omnistrate.com/schedule-mode: exclusive

        replica:
          podLabels:
            omnistrate.com/schedule-mode: exclusive
...
Then, set the affinity rules for the Redis Master and Replica pods.
...
          affinity:
            nodeAffinity:
              requiredDuringSchedulingIgnoredDuringExecution:
                nodeSelectorTerms:
                  - matchExpressions:
                    - key: omnistrate.com/managed-by
                      operator: In
                      values:
                      - omnistrate
                    - key: topology.kubernetes.io/region
                      operator: In
                      values:
                      - $sys.deploymentCell.region
                    - key: node.kubernetes.io/instance-type
                      operator: In
                      values:
                      - $sys.compute.node.instanceType
                    - key: omnistrate.com/resource
                      operator: In
                      values:
                      - $sys.deployment.resourceID
                    - key: omnistrate.com/version
                      operator: In
                      values:
                      - $sys.compute.node.version
            podAntiAffinity:
              requiredDuringSchedulingIgnoredDuringExecution:
              - labelSelector:
                  matchExpressions:
                  - key: omnistrate.com/schedule-mode
                    operator: In
                    values:
                    - exclusive
                namespaceSelector: {}
                topologyKey: kubernetes.io/hostname
...
You might have noticed the use of system parameters ($sys.deploymentCell.region, $sys.compute.node.instanceType, $sys.deployment.resourceID, and $sys.compute.node.version) in the affinity rules. These variables are used to dynamically set the affinity rules based on the customer's deployment configuration. For more information, see System Parameters.
Example specification with customized Helm Chart Values
The following example uses the default automatic affinity injection, so no manual affinity rules are needed in the chart values:
name: Redis Server # Plan Name
deployment:
  hostedDeployment:
    awsAccountId: "<AWS_ACCOUNT_ID>"
    awsBootstrapRoleAccountArn: arn:aws:iam::<AWS_ACCOUNT_ID>:role/omnistrate-bootstrap-role

services:
  - name: Redis Cluster
    compute:
      instanceTypes:
        - apiParam: instanceType
          cloudProvider: aws
        - apiParam: instanceType
          cloudProvider: gcp
        - apiParam: instanceType
          cloudProvider: azure
    network:
      ports:
        - 6379
    helmChartConfiguration:
      chartName: redis
      chartVersion: 24.1.0
      chartRepoName: bitnami
      chartRepoURL: https://charts.bitnami.com/bitnami
      chartValues:
        master:
          persistence:
            enabled: false
          service:
            type: LoadBalancer
            annotations:
              external-dns.alpha.kubernetes.io/hostname: $sys.network.externalClusterEndpoint
          resources:
            requests:
              cpu: 100m
              memory: 128Mi
            limits:
              cpu: 150m
              memory: 256Mi
        replica:
          persistence:
            enabled: false
          replicaCount: $var.replicas
          resources:
            requests:
              cpu: 100m
              memory: 128Mi
            limits:
              cpu: 150m
              memory: 256Mi
    apiParameters:
      - key: replicas
        description: Number of Replicas
        name: Replica Count
        type: Float64
        modifiable: true
        required: false
        export: true
        defaultValue: "1"
      - key: instanceType
        description: Instance Type
        name: Instance Type
        type: String
        modifiable: true
        required: false
        export: true
        defaultValue: "t4g.small"
Note
Compare this with the manual approach — you no longer need to specify podLabels, nodeAffinity, or podAntiAffinity in the chart values. Omnistrate injects the appropriate rules automatically at deploy time.
Example with manual affinity rules (automatic injection disabled)
If you need full manual control over affinity rules, disable automatic injection and define the rules explicitly:
name: Redis Server # Plan Name
deployment:
  hostedDeployment:
    awsAccountId: "<AWS_ACCOUNT_ID>"
    awsBootstrapRoleAccountArn: arn:aws:iam::<AWS_ACCOUNT_ID>:role/omnistrate-bootstrap-role

services:
  - name: Redis Cluster
    compute:
      instanceTypes:
        - apiParam: instanceType
          cloudProvider: aws
        - apiParam: instanceType
          cloudProvider: gcp
        - apiParam: instanceType
          cloudProvider: azure
    network:
      ports:
        - 6379
    helmChartConfiguration:
      chartName: redis
      chartVersion: 24.1.0
      chartRepoName: bitnami
      chartRepoURL: https://charts.bitnami.com/bitnami
      chartAffinityControl:
        enableInjection: false
      chartValues:
        master:
          podLabels:
            omnistrate.com/schedule-mode: exclusive
          persistence:
            enabled: false
          service:
            type: LoadBalancer
            annotations:
              external-dns.alpha.kubernetes.io/hostname: $sys.network.externalClusterEndpoint
          resources:
            requests:
              cpu: 100m
              memory: 128Mi
            limits:
              cpu: 150m
              memory: 256Mi
          affinity:
            nodeAffinity:
              requiredDuringSchedulingIgnoredDuringExecution:
                nodeSelectorTerms:
                  - matchExpressions:
                    - key: omnistrate.com/managed-by
                      operator: In
                      values:
                      - omnistrate
                    - key: topology.kubernetes.io/region
                      operator: In
                      values:
                      - $sys.deploymentCell.region
                    - key: node.kubernetes.io/instance-type
                      operator: In
                      values:
                      - $sys.compute.node.instanceType
                    - key: omnistrate.com/resource
                      operator: In
                      values:
                      - $sys.deployment.resourceID
                    - key: omnistrate.com/version
                      operator: In
                      values:
                      - $sys.compute.node.version
            podAntiAffinity:
              requiredDuringSchedulingIgnoredDuringExecution:
              - labelSelector:
                  matchExpressions:
                  - key: omnistrate.com/schedule-mode
                    operator: In
                    values:
                    - exclusive
                namespaceSelector: {}
                topologyKey: kubernetes.io/hostname
        replica:
          podLabels:
            omnistrate.com/schedule-mode: exclusive
          persistence:
            enabled: false
          replicaCount: $var.replicas
          resources:
            requests:
              cpu: 100m
              memory: 128Mi
            limits:
              cpu: 150m
              memory: 256Mi
          affinity:
            nodeAffinity:
              requiredDuringSchedulingIgnoredDuringExecution:
                nodeSelectorTerms:
                  - matchExpressions:
                    - key: omnistrate.com/managed-by
                      operator: In
                      values:
                      - omnistrate
                    - key: topology.kubernetes.io/region
                      operator: In
                      values:
                      - $sys.deploymentCell.region
                    - key: node.kubernetes.io/instance-type
                      operator: In
                      values:
                      - $sys.compute.node.instanceType
                    - key: omnistrate.com/resource
                      operator: In
                      values:
                      - $sys.deployment.resourceID
                    - key: omnistrate.com/version
                      operator: In
                      values:
                      - $sys.compute.node.version
            podAntiAffinity:
              requiredDuringSchedulingIgnoredDuringExecution:
              - labelSelector:
                  matchExpressions:
                  - key: omnistrate.com/schedule-mode
                    operator: In
                    values:
                    - exclusive
                namespaceSelector: {}
                topologyKey: kubernetes.io/hostname
    apiParameters:
      - key: replicas
        description: Number of Replicas
        name: Replica Count
        type: Float64
        modifiable: true
        required: false
        export: true
        defaultValue: "1"
      - key: instanceType
        description: Instance Type
        name: Instance Type
        type: String
        modifiable: true
        required: false
        export: true
        defaultValue: "t4g.small"
Apply changes to the service
For this we will run the same command that was used to setup the service the first time.
omnistrate-ctl build -f spec.yaml --name 'RedisHelm' --release-as-preferred --spec-type ServicePlanSpec

# Example output shown below
✓ Successfully built service
Check the Plan result at: https://omnistrate.cloud/product-tier?serviceId=s-dEhutaDa2X&environmentId=se-92smpU2YAm
Access your SaaS Product at: https://saasportal.instance-w6vidhd14.hc-pelsk80ph.us-east-2.aws.f2e0a955bb84.cloud/service-plans?serviceId=s-dEhutaDa2X&environmentId=se-92smpU2YAm
Deploying a Redis Cluster through your dedicated Customer Portal
Now, your customers can deploy Redis Clusters with the desired instance type and number of replicas through the dedicated customer portal. The portal will use the REST API parameters to customize the deployment based on the customer's requirements. 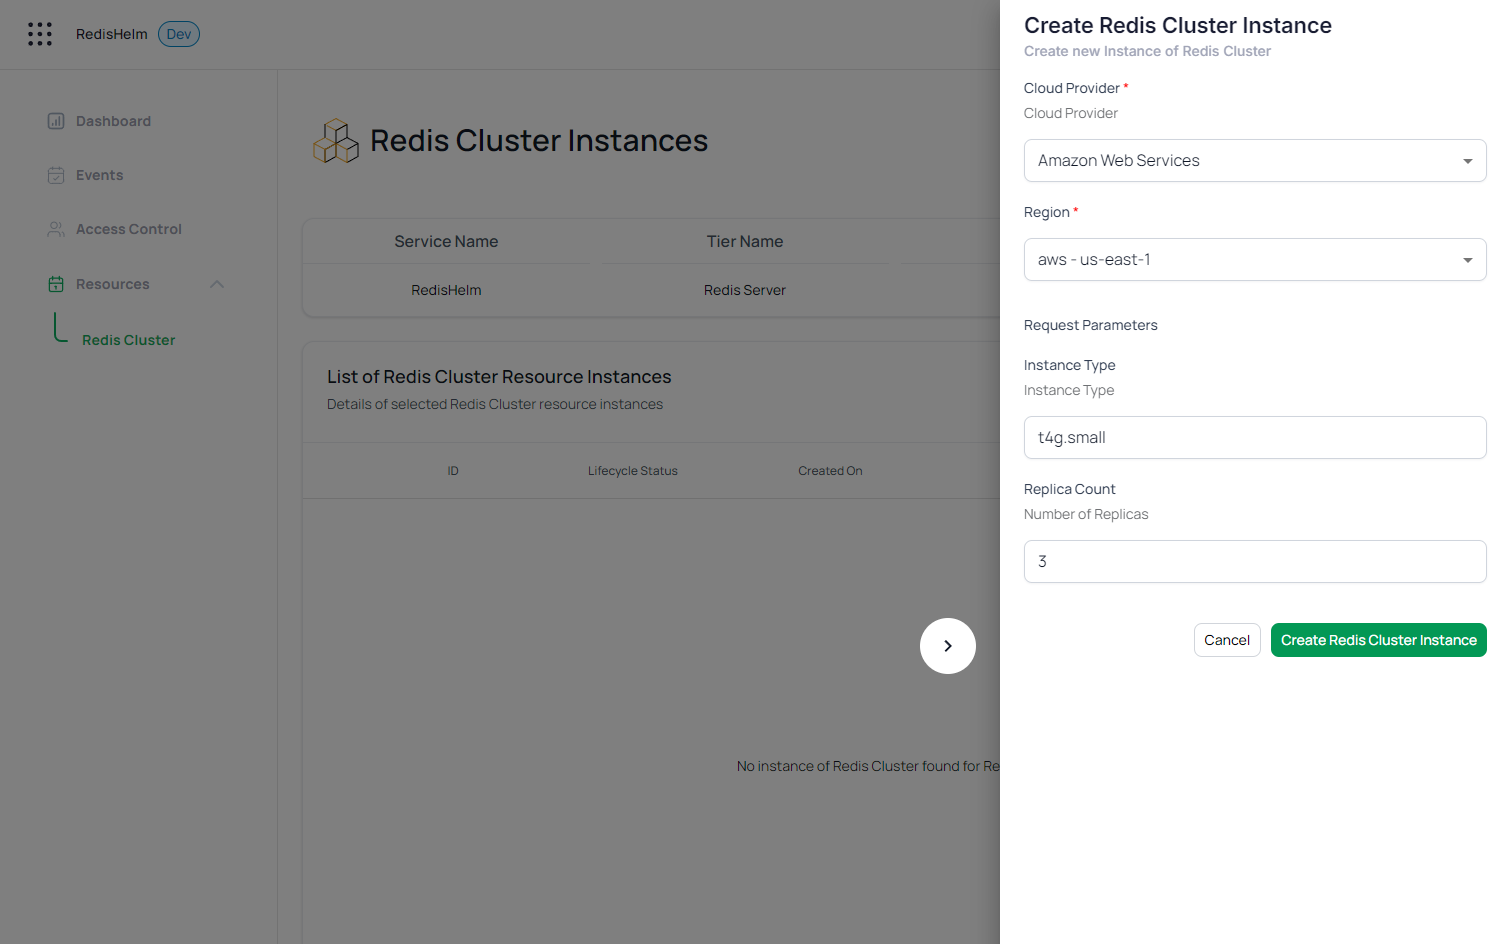
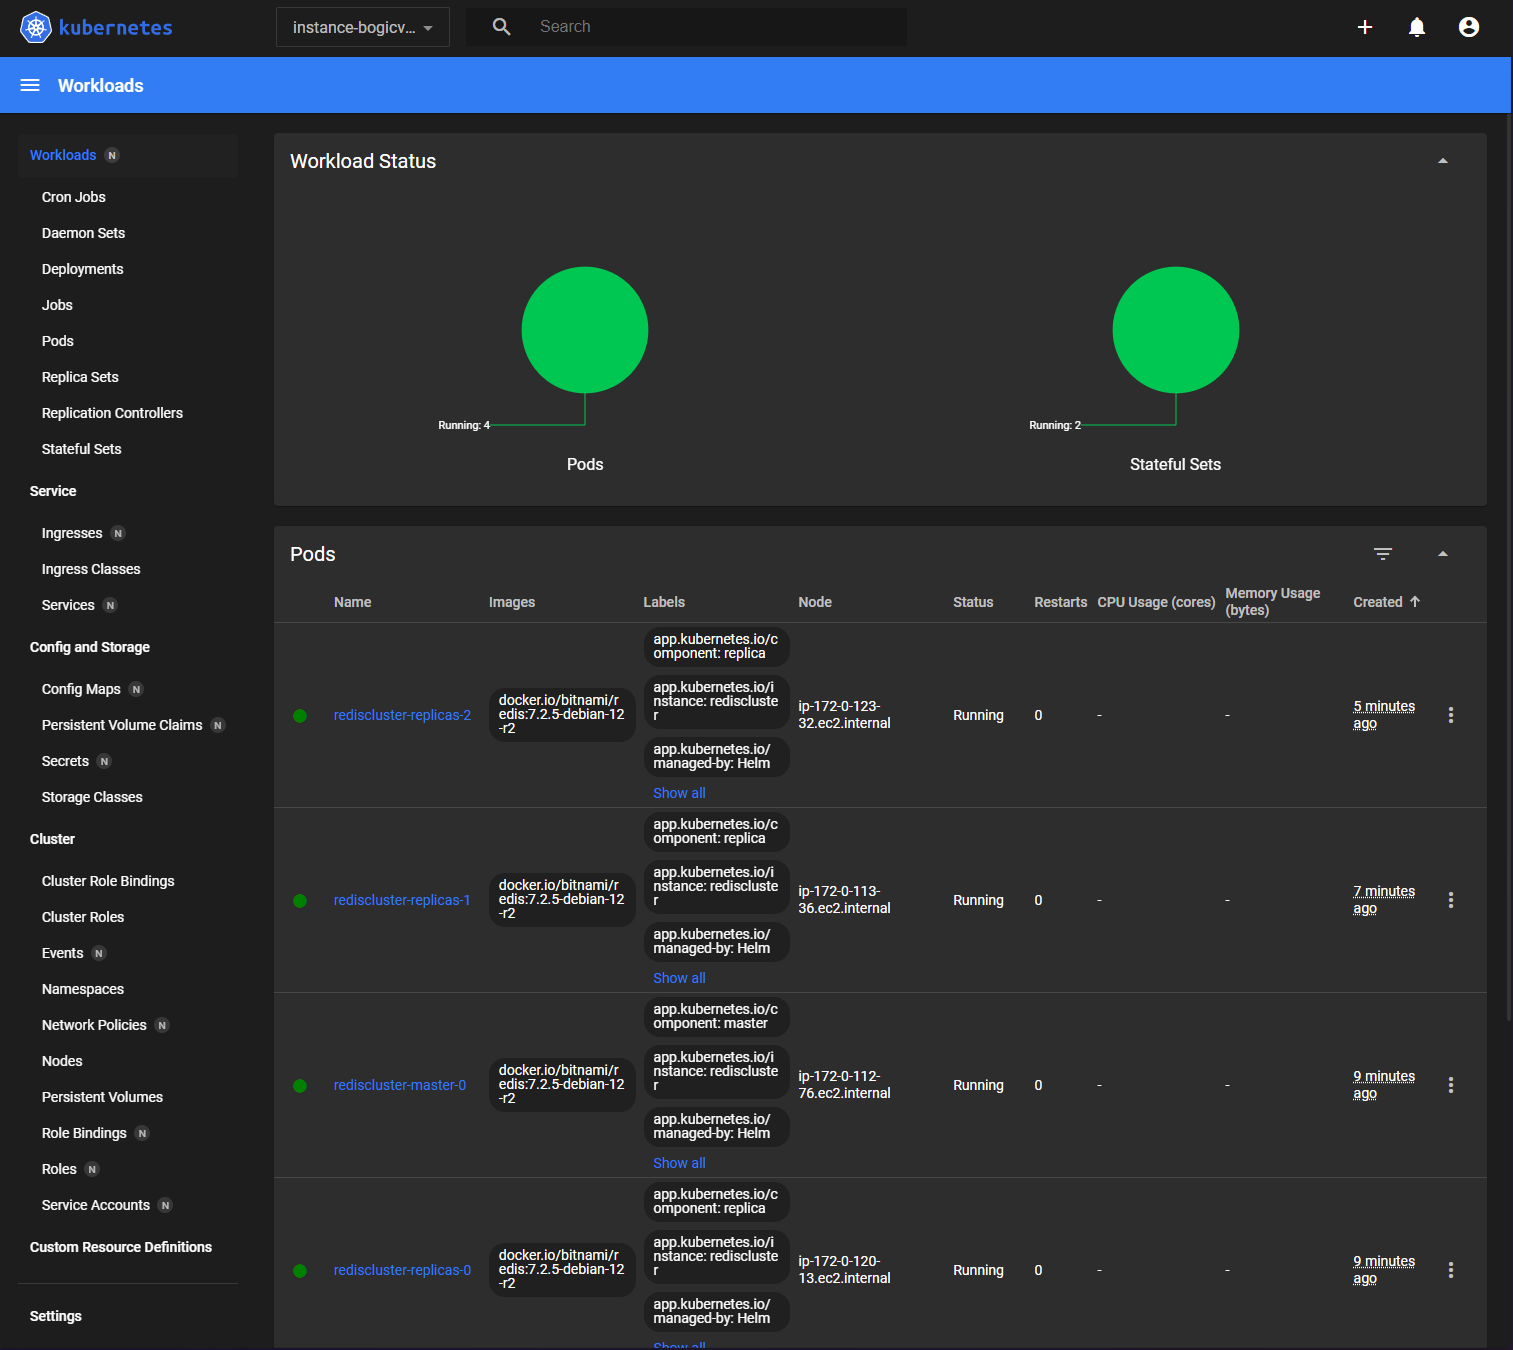
The final cluster status 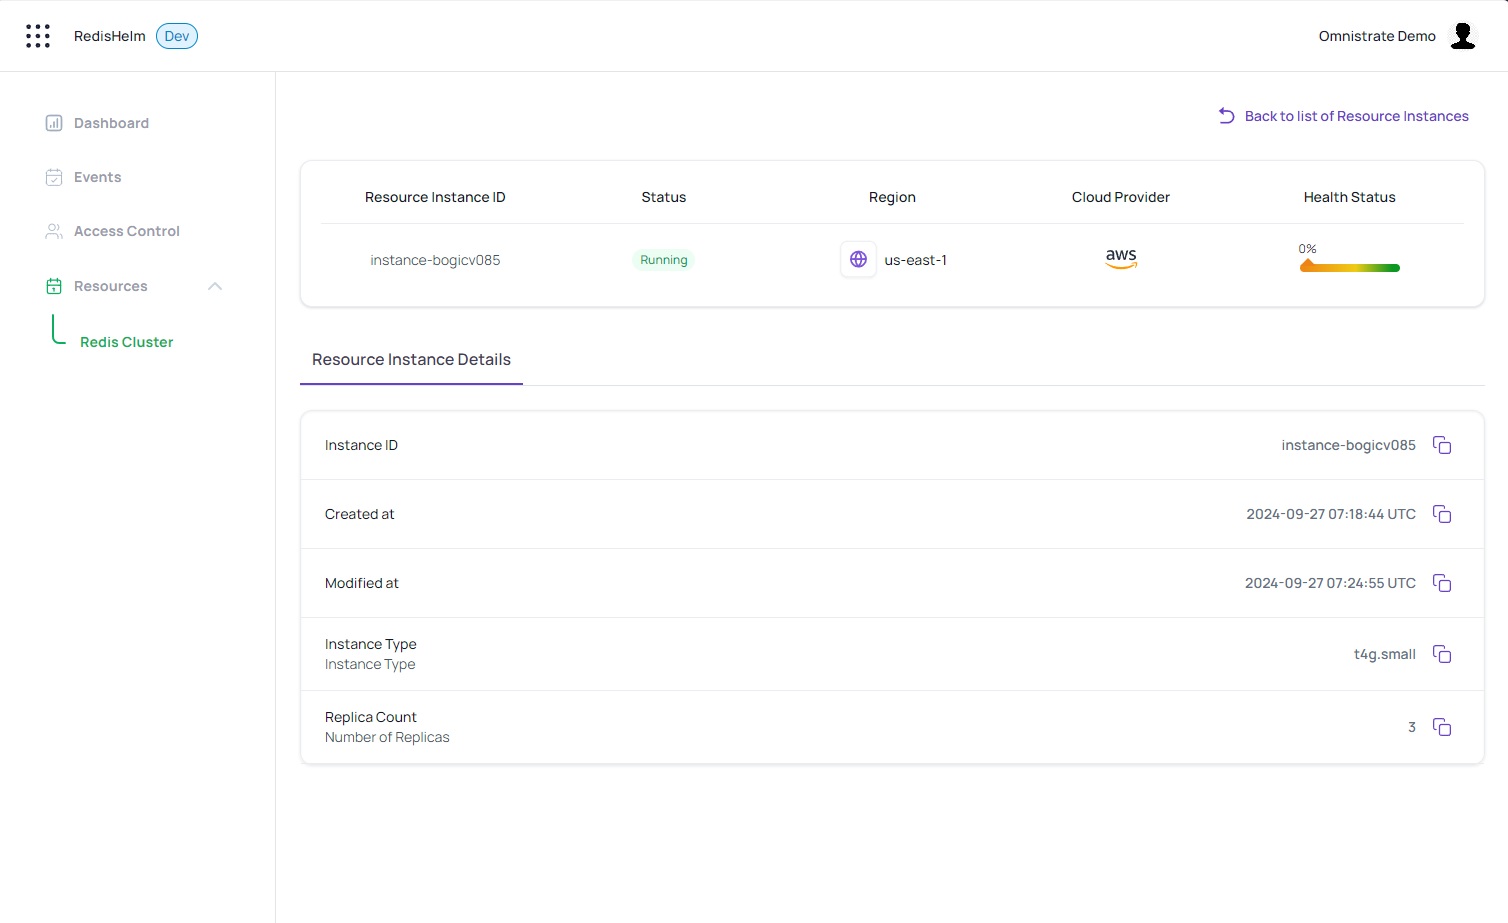
And the workload status in the Kubernetes Dashboard confirming the placement of pods on independent VMs